Showing posts with label DIY. Show all posts

Monday, March 26, 2012

Bars (and not the drinking kind!)

With dessert and weddings on the brain, and their always on the brain, we were intrigued by the latest wedding trend: bars - dessert bars, popcorn bars, doughnut bars, cookie bars, sundae bars, smores bars, waffle bars, and cigar bars (had to throw one in there for the boys!). These options are endless and the list goes on. What makes this concept so perfect? More is always better when it comes to treats. Check out some of our favorite "bar" ideas.

For a spring or summer wedding, consider a sundae and ice cream bar. Make your own sundae bars are perfect for these warmer months shindigs. Think about the amazing (and affordable) selection you could provide - sprinkles, cherries, whipped cream, ooey goeey marshmallow sauce, and any thing you could imagine on an ice cream sundae. For a refreshing and lighter choice, offer a few flavored sorbets as well. If you're big day is during a spring month, integrate some of the seasons best fruits.

Thursday, March 15, 2012

Removing the "book" from guestbook

For the home decor enthusiast
When I think about guestbooks I'm reminded of a Sex and the City episode where Miranda's wedding duty was to "man" the guest book. In the episode she's standing next to a book on a table, with a pen in her hand saying, "sign the guestbook?". Gone are the days where a guestbook consists of a book and a pen. These days couples are breaking boundaries of creativity and being inspired by what they love... music, photography, home decor, and using their guestbooks to incorporate them into their guests into their daily lives.

They say a picture is worth a thousand words; here, your guests can have the best of both worlds. Set up a table with a Polaroid camera, blank-paged guestbook, and several pens. Each guests or couple can have their own page where they will post their Polaroid portrait and have ample room to write their best wishes, advice to, or favorite memories of the newlyweds. Larger weddings will require a larger guestbook (or just more paper) while a photo booth (DIY?) could take the place of a Polaroid camera. Not only will you have a special note from your loved ones, but you'll have priceless pictures of them the very momoment they wrote it!

Monday, March 12, 2012

because 3 (or more) is always better than one!

Disclaimer: There is a soft spot in my heart for Sweet and Saucy cakes. Please be prepared for inspiration overload!


For a refreshingly unique (and often less expensive) way to end your reception’s dinner, couples are moving away from the traditional tiered wedding cake. Instead, they opt for a more distinctive style: several smaller cakes, an assortment of homemade pies, and cupcakes to create a bite-size dessert buffet. While a larger cake has its appeal (grand design, picturesque, very tall, more to eat), this contemporary approach certainly has its advantages.

Monday, November 7, 2011

Metallic Pumpkins: Chevron + Gold

Im super in love with shades of gold and chevron patterns right now, and have been working them into my home over this past year. It came to no surprise to me when I started pinning metallic pumpkins on Pinterest when the fall season was approaching, so I guess you could say this was a Pinterest challenge of my own, but technically it was out of holiday laziness and decor friendliness!

My family actually went pumpkin picking a little late in the season this year... only a couple of weekends ago. But, my thoughts were clear... pick late and let them be used as double duty for Halloween and as close as I can get them to Thanksgiving. So far, so good! I picked out pumpkins,  birdhouse gourds, mini pumpkins, gourds, and cinderalla pumpkins (the white/ivory ones). I went for different sizes and types!

Monday, September 26, 2011

Outdoor Lawn Games... We do!

Summer is coming to an end, and the cooler temperatures have just started to take a turn for, shall we dare say it, comfortable. This is just around the time when I actually enjoy outside cocktail hours and watching the bride and groom from afar, especially the guests. Most often times they linger, and strike up casual conversation and often times find an excuse to go grab another cocktail and move onto the next guest. Why not turn up the FUN factor?
 
 
After watching so many outdoor cocktail hours at a distance, the one trend we have enjoyed (and even giggle at on occasion) is watching guests partake in interactive games on the lawn. Yes, you have read this correctly. Games. No, not the cheesy games that you dread when attending a baby or bridal shower (and even those haven’t been so bad as of late), but actual lawn games. Yes, the ones that you may find at a tailgate or even at a BBQ, but none the less... interactive and enjoyable to watch; even crowd pleasers! Think cornhole, horseshoes, bocce, and croquet. Black tie or khaki suited, we don’t mind if we do. It is a great way to entertain your guests and just another way to work your theme and colors into your wedding (think custom colored bean bags and silhouette painted boards!). We just adore these images shared by BG Productions from Marissa and Brians vintage wedding at the John J. Audubon Center this past season. Don’t forget to place Adirondack chairs for the spectators because we promise this will be a crowd pleaser! Enjoy the inspiration <3

Friday, June 10, 2011

Parson Desk Redo: Take Two!

Where do I begin? I heart it! So, it has taken me about three weeks, four coats of ultra white Behr paint, touch up paint because I was impatient, two coats of a polyacrylic (?) for protection because I was impatient, some new hardware, and a can of gold spray paint for the hardware... but its now complete! If you are just joining us and you have no idea what I am talking about... I just recently inherited "my new PARSONS desk!", and it was going to need a complete redo. And yes, I do consider paying $25.00 for this desk the same as inheriting. It was basically a steal! Check out some images below of it placed in my home:

Thursday, May 26, 2011

DIY: Tissue Paper Lantern

Martha Stewart does it again... First the tissue hanging pom fad (which we love), and now this amazing Tissue Paper Petal Lantern that closely resembles a peony flower just before bloom! And if that was not enough, these masterpeices only take about thirty minutes each. If you have not picked up your Martha Stewart Living Spring June '11 Issue, then do not worry, we have the complete how-to here :

Tools and Materials:    Double Sided Tape

5" Tissue Paper Circles in Pastel + Primary, $6 for 480, hyglossproducts.com

Wire-frame Spherical Paper Lantern, $3.25 to $4.25 for 14-18", pearlriver.com

Martha Stewart even offered up the ideas of creating an ombre pattern (gradations of the same color), or even using round green tissue paper at the top for the illusion of berries! We honestly cannot wait for the opportunity to use these at our next event... whether it is a shower, wedding, or 30th Birthday Party (hint hint - that's right, mine is coming up soon!)

Tuesday, March 22, 2011

Office Renovations... have begun!

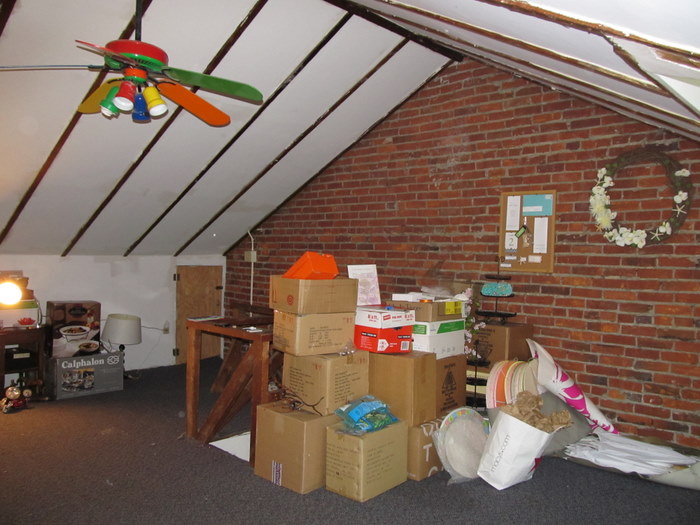
I know that I can honestly say that we are all really excited for the office remodeling to begin! Here is a re-cap... I am taking my 15'x23' attic space which is partially redone, and making into a fabulous office space for LovelyGirls to collaborate amongst each other and offer it as a meeting space for clients until we decide to open up shop; One where all of the home decor bloggers will be drooling over once the space is finished!

The winding staircase would be more functional  if it boasted a wider entrance than the 2.5 feet wide dimensions, but 2.5ft could even be stretching it! There will be very little assembled furniture headed up the staircase, more like boxes and boxes of Ikea and target furniture. I have managed to fit a desk up into the office that I plan on breathing a little bit of life into.

But imagine, a nice fresh clean coat of white paint on the side walls and on the underneath of the steps. The wood grains will shine through on the top of the step with a deep, dark black walnut stain (just like the rest of our home). The eventual plan will to have a frosted glass door at the base of the steps for some privacy. In the mean time, a fresh coat of paint will have to do on the current door that is original to our 1937 colonial duplex home. I have thought long and hard, and have decided that for the time being, the wood banister at the top will stay, some minor changes, but it will keep with the rustic aspects of the original wide plank flooring that that we plan to refinish.

If I had to answer what my favorite part of the remodel would be after it is all finished, I would have to admit, my little nook near the window which I plan on wallpapering and hanging a pendant lamp over my desk. The big debate is to face my desk at the window and enjoy the natural sunlight, or have my desk face the room taking in all of the beautiful hard work and decor geniusness after it is all finished. Here is a list of some of the projects that are on the "honey-do" list:

  • paint all walls and ceiling white, keeping the original red brick on the wall
  • re-do trim around new windows.
  • wall paper little nook with floral wallpaper around windows
  • pendant lamp in nook over desk
  • trim all around the floor base
  • refinish wide plank flooring
  • solution for attic doors (still at a loss)
  • replace hideous ceiling fan with track lighting
  • replace all outlets and outlet covers
  • buy new furniture (ummm... yay!)
  • ... TBD. I'll have to let you know!
I would say half of the battle was to cleaning  out the cross space areas in the attic which were cluttered with old metal mini blinds, huge mirrors, and soccer pads from the previous owner. <-- Yes Really! Then we went through and organized all of the apothecary jars, vases, pictures frames, cupcake stands, vase fillers, and etc. for LovelyGirls into one corner. The other corners, well they are a mix of Steelers memorabilia, miscellaneous furniture pieces, pillows, and yes, sad to say, a brand new box of Calphalon pots and pans that we haven't used yet. Its bitter sweet!

Here is the proposed layout that I designed with the Ikea Planner services for offices (I can now only find kitchen + wardrobe planners now). I did this over a year ago, so some of our furniture selections have changed in the mean time! We will of course have a meeting area, desk space, a media area for fax machines, paper, and printers, and then the Ikea Expedit bookcase for files and to display some featured rental pieces.


We can't wait to share the before and afters. In the mean time, enjoy some of the "before" pictures of the space! It is going to be so great, and we really cannot wait to showcase it! :)


Below is the small corner in the attic that I am currently working out of. Trust me, it is better than being in the dining room and living room at times, and it allows me to focus on clients and completing tasks that I have set aside for myself. The desk below is the desk that I plan on refinishing, and once painted white, I think it is going to look great against the dark walnut stained original plan flooring. This is also the area where I plan on locating our media station. In the mean time, I've got some painting to do this week... make sure to stop back by and monitor the progress!


nicole brennan  .  302.545.0412  .  nicole@lovelygirlsevents.com  . wilmington

Tuesday, March 15, 2011

guest blogger: Sparkles + Bling

Since we have been a little MIA on the blogging scene (renovations being completed), we reached out to bride, Christina Cameron, and asked her to share a DIY tutorial on the completely encrusted Swarovski crystal bridal shoes that she just completed in 16 hrs (if you do that math, that is four friday nights out with the girls you would be missing!). Completely worth it though... how amazing are they?

From Christina:

"I love sparkles and bling, so of course I had to incorporate that into my wedding theme! After seeing numerous celebrities like Beyonce' and Sarah Jessica Parker in their Christian Louboutins, I became obsessed! Unfortunately, Christian Louboutins come with a price tag of about $3,000.00 which is a tad over my wedding budget to say the least! After searching store after store for the perfect bridal shoes and coming up empty handed every time, I decided that if I couldn't find what I was looking for I would just make it! I did some research online, and found an awesome website to order supplies. From there I began the process of creating my dream wedding shoe."

Monday, February 7, 2011

DIY: Fluffy Lantern

So as I have been a little under the weather, I have taken to scouring lots of home decor and DIY blogs for my upcoming renovation. When I came across this lighting fixture made out of over 1200 Coffee Filters on the Parlour blog, I fell in love with the size and the texture. She orginally was inspired by the same lamp on the cover of Downtown Chic: Designing Your Dream Home: From Wreck to Ravishing. <--- sounds kind of like my home! Now, I just have to find the right place to put this... the office maybe? Here is a step-by-step tuorial just for you!

Supplies:

Paper Lantern Lamp
Glue Gun
over 1200 Coffee Filters

Tuesday, January 25, 2011

DIY: Photo Booth Wall

Never having been one to walk the straight line, I have always been inspired and intrigued by art, color, floral, and decor; Things that qualify as maybe just a little bit offbeat. When I came across all of these untraditional options for a make shift photo booth for guests at childrens parties and weddings, I could not help but share! How cute are they?  You might find familiar between all of the pictures the IKEA Ung Drill frame all varying in different shades of pink, orange, white, green, and black! We included a really great DIY Photobooth Wall from Ruffled. For $80.00, it might just peak your interest! Next week we will include templates for DIY Mustaches, Lips, Glasses, and etc!

Sunday, January 23, 2011

DIY: Valentines Day Freebies!

I LOVE just enjoying a lazy day of football and just perusing the internet and blogs for inspiration and ideas! This weekend I came across these really cute Valentines Day cards by 74 Lime Lane that were inspired by the WWII "Keep Calm and Carry On" posters!


And then there were these absolutely adorable mini Valentines Day cards by Style Crush that you can pass out to your co-workers or print up for the kiddies and send with them to their local gradeschool classroom! Download the PDF here and make sure to print in landscape mode.

Monday, January 17, 2011

DIY: Picture Frame Dry Erase Board

james wojcik
I am constantly taking mental notes of items I will need from the grocery store as I realize I am running low on something , but often times, I end up forgetting to put it on my list by the end of the week. I can never find a sticky note pad with a pattern that I feel is worth while to invest in, and if I do, I feel the need to buy the entire stock on the shelves. Of course, it will last me a long time, but it reminds me of when you run out of your favorite red lipstick, and just as conveniently your department store has stopped stocking it as well. So, when I came across this great DIY from realsimple.com for a dry erase board, I figured I would share it with you as well. An idea for a pretty dry erase board that serves as wall art when not in use. Now, that is right up my alley! One for the kitchen and one for the office, so how could I say no? I think they will even serve as great christmas gifts for next year, or even to be able to change out seasonally, or as my decor moods change. I will say that the DIY is pretty self explanatory, but I was gracious enough to include instructions :)

Saturday, January 8, 2011

DIY: Felt Holly Corsage

For a playful nod to the traditional seasonal/holiday pin, try these cheerful corsages! Do not mistake, these are just not for the holiday season, as they can be used in any winter themed wedding or party.  They're easy enough for a child to make but sophisticated enough for her mom to wear! Once you gather your supplies, it's a snap to make multiple corsages in a single afternoon. You can use an assortment of trimmings: tiny glass ornaments, pom-poms, snipped pieces of tinsel, and velvet and silk ribbons to embellish ours, but you could also use buttons, beads, special fabric you've been saving, or antique milliner flowers found at a flea market.
Step 1
Print the template, and cut out. From a piece of felt, cut one 2 1/2-by-5-inch rectangle for each pair of leaves. Fold rectangle in half lengthwise.

Tuesday, January 4, 2011

Gray + White: Winter Glam Dinner

I have always bee a fan of modern. Modern meets old, modern meets bright, and modern meets rustic. Once, when I was younger, I thought I would really enjoy a log cabin in the middle of a large city, or a brownstone in the middle of the woods. I could never quite find the right explanation. However, in my search for the perfect winter inspiration, I found this great Winter Glam Table on Hostess with the Mostess. Chainlink fabric table runner, silver spray painted succulents, sparkly beaded napkin rings, white grapewood branches (also spray painted), and fluffy white floral arrangements embellished with dusty miller foliage for a festive, wintery vibe.

This "Rustic-meets-Modern" style from Carissa of JL Designs is fantastic (even if it is for a holiday party!). This could so double for a small winter wedding, bridal luncheon, or even a chic bridal or baby shower! Did we mention that this is very D-I-Y friendly?


“I found the gray & white chain link patterned fabric in the garment district in downtown LA. The silver “flowers” are actually succulents that I spray painted silver! Great diy idea for new years! I did something similar in gold for this Martha Stewart photo shoot – it’s super cheap & easy and adds that instant touch of glam to a party! I also spray painted grapewood branches white and accented them w/ the silver succulents." - Carrissa from JL Designs

Friday, December 31, 2010

DIY: Tinsel New Year's Number Banner

Got a little extra time between say now and midnight? Well these sparkly tinsel garlands make flashy party decor for New Year's Eve!


Don't pack up the Christmas decorations before you ring in the New Year. Sparkly tinsel garlands make flashy party decor. Here's how to turn the countdown into a glittery affair.

Make a Number Banner
Download the Martha Stewart "2011" template and print onto card stock. Cut out, and punch 2 small holes at the top of each numeral. String numbers onto a 2-yard length of ribbon. Use a hot-glue gun to attach a length of tinsel garland to each number, snipping ends. Hang with thumbtacks.


Read more at Marthastewart.com: Tinsel New Year's Number Banner - Martha Stewart Crafts

Tuesday, November 9, 2010

DIY: Button Boutonniere

We found this great DIY on Inspired Bride, and Karen from Silverberry Occasions was kind enough to share with them some of the lovely DIY projects she created for the Vintage Sewing shoot featured over a month ago. First up is an absolutely adorable (and super colorful!) button boutonniere that will add a little quirk to any wedding!


Related Posts Plugin for WordPress, Blogger...